Interfacing Of LCD With Arduino Uno, Code, Explanation, Diagram
Hello guys, welcome back to my blog. In this article, I will discuss the interfacing of LCD with Arduino Uno, code for Arduino with LCD, explanation of code, etc.
If you require an article on some other topics then comment us below in the comment below. You can also catch me @ Instagram – Chetan Shidling.
Also, read:
- Difference Between Arduino Uno, Nano, Mega, Features, Applications
- Interfacing Of Arduino With Temperature Sensor
- Top 15 Sensors For Engineering Projects
Interfacing Of LCD With Arduino Uno
Primarily, the LCD is generally known as Liquid Crystal Display. It is practiced to have a digital interface with the electronic environment through its display screen. The output of the processed data can be seen and can be read by the person easily with this LCD module.
16*2 LCD screen includes about 16 pins out of which 8 pins are the data pins (pins from 7 to 14) and there are two pins (1 and 16) for VCC and GROUND. Three Pins are used to control the functioning and operations of LCD (pins 4,5,6) and pin 3 is used to change the brightness of the LCD screen. The leftover pins 15 and 16 are used to power the LCD.

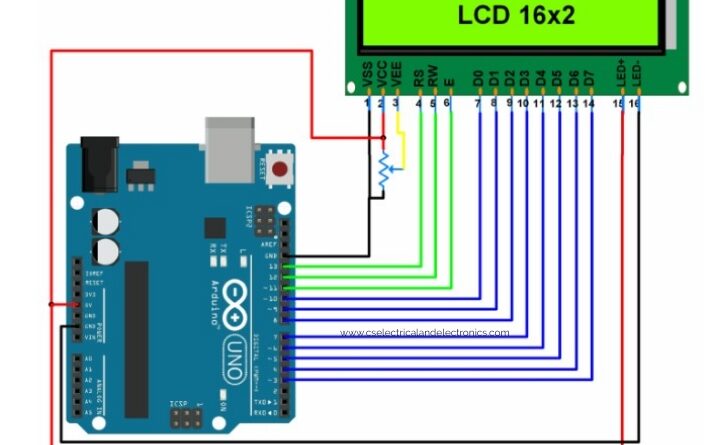
The total pinout diagram of the LCD screen where each and every pin is shown in detail. The Pins are specified with a complete name and position.
Connecting the LCD with Arduino
This 16*2 LCD screen can be used in an 8-bit mode or 4-bit mode to display the different parameters. All the 16 pins are connected to the ARDUINO board in the following way.
Initially, VCC and the LED+ pins are connected to the positive terminal of the battery to provide the power to the board. VSS and the LED- pins are short-circuited and connected to the GROUND terminal to complete the circuit for the power supply. These LED terminals are essentially used to supply the power to the LCD and switch the LED lights to ON position that are present in the LCD screen display.
Now the 8 data pins starting from D0 to D7 are connected to the digital pins on the ARDUINO board starting from 10 to 3 as shown in the circuit diagram. Eventually, the ENABLE, READ/WRITE, and the REGISTER SELECT pins are connected to the 11, 12, and 13 numbered digital pins on the ARDUINO board. The leftover VEE pin is connected to the GROUND terminal. The terminals from the LCD screen to the ARDUINO board are connected using a different kind of Jumper Wires.
This makes the entire connection of the LCD screen to the ARDUINO board for the functioning of it. The entire explanation is done with regarding to the circuit diagram shown below.
Once the complete connection of the component to the ARDUINO is done absolutely without any error the entire software coding can be done easily without any sort of issues.

Arduino code for LCD screen
#include <LiquidCrystal.h>
/* Create object named lcd of the class LiquidCrystal */
LiquidCrystal lcd(13, 12, 11, 10, 9, 8, 7, 6, 5, 4, 3);	/* For 8-bit mode */
//LiquidCrystal lcd(13, 12, 11, 6, 5, 4, 3);	/* For 4-bit mode */


unsigned char Character1[8] = { 0x04, 0x1F, 0x11, 0x11, 0x1F, 0x1F, 0x1F, 0x1F };	/* Custom Character 1 */
unsigned char Character2[8] = { 0x01, 0x03, 0x07, 0x1F, 0x1F, 0x07, 0x03, 0x01 };	/* Custom Character 2 */

void setup() {
  lcd.begin(16,2);	/* Initialize 16x2 LCD */
  lcd.clear();	/* Clear the LCD */
  lcd.createChar(0, Character1);	/* Generate custom character */
  lcd.createChar(1, Character2);
}

void loop() {
  lcd.setCursor(0,0);	/* Set cursor to column 0 row 0 */
  lcd.print("Hello!!!!");	/* Print data on display */
  lcd.setCursor(0,1);
  lcd.write(byte(0));	/* Write a character to display */
  lcd.write(1);
}
Later the successful compiling of the code, it is dumped into the ARDUINO board. Now the code runs and displays on the LCD screen.
Arduino and LCD interfacing program explanation
Originally, Liquid Crystal Libraries are included in the program then the pins that are connected to the 8-bit display are mentioned in the code. Now the custom characters are defined to use them on the LCD.
In the Void setup function is declared and the following things are mentioned.
- lcd.begin function is used to initialize the LCD screen of 16*2.
- lcd.clear function is used to clear the LCD screen.
- lcd.createChar are used to create characters that are to be displayed.
Now the Void Loop function is declared where entire code is written. The functions used in this void loop are
- lcd.setCursor function is used to set the cursor on to the LCD screen.
- lcd.print is used to print the output on the LCD screen.
- Lcd.write function is used to display the custom character on the LCD screen.
Working of LCD screen
After the perfect connection and dumping of the code to the ARDUINO board the LCD screen display functions in the following way. Originally, the entire LCD screen clears and only the backlight is visible then the message “Hello!!!!” is displayed on the LCD screen.
Next, the cursor sets to the next column and the initiated custom character or the written character displays on the screen of the LCD. This completes the entire explanation of the code and this process continues till there is a break in the loop.
The above discussed program and the connections are the basics to start with the LCD screen interfacing with the ARDUINO and how it can be used to display the output messages or the parameters. This article helps to be the start guide for the working on the LCD display and any sort of the common mistakes that are evolved while interfacing the components or the functioning of the code can be easily overcome by following the detailed explanation mentioned in this article.
If you have any doubts on “interfacing of Arduino with LCD” , then comment below. I hope this article may help you all a lot. Thank you for reading.
Also, read:
- 100 + Electrical Engineering Projects For Students, Engineers
- 1000+ Electronics Projects For Engineers, Diploma, MTech Students
- 1000+ MATLAB Simulink Projects For MTech, Engineering Students
- 500+ Embedded System Projects For Engineer, Diploma, MTech, PhD
- 500+ Projects For Diploma Electrical, Electronics Student, Diploma Project
- 8051 Microcontroller Timers, TCON Register, TMOD Register
- Advancements In 3D Printing Technology And It’s Future
- Advancements In Power Electronics For Energy Efficiency
- AI Tools For Electronic Circuit Design, Which Is Best?
- Analog Electronics Interview Questions Most Commonly Asked
- Applications Of IoT, Internet Of Things, What Is IoT, Latest Technology
- Applications Of Microcontrollers, Embedded System Applications
- Automotive Electronics Interview Questions For Engineers, Automobile
- Automotive Industry Or VLSI Chip Industry ? Which Is Best?
- Autonomous Vehicles: The Future Of Transportation
- Best Engineering Branch For Future
- Best Programming Languages For Electrical and Electronics Engineers
- Cadence Technical Interview Questions For EE And EC Students
- CAN Protocol Tutorial, Working, Frames, Interview Q’s, Errors
- Difference Between .Hex .Bin .Elf .Axf Files, Purpose, Examples
Author Profile
- Chetu
- Interest's ~ Engineering | Entrepreneurship | Politics | History | Travelling | Content Writing | Technology | Cooking
Latest entries
 All PostsApril 19, 2024What Is Vector CANoe Tool, Why It Is Used In The Automotive Industry
 All PostsApril 13, 2024What Is TCM, Transmission Control Module, Working, Purpose,
 All PostsApril 12, 2024Top 100 HiL hardware in loop Interview Questions With Answers For Engineers
 All PostsMarch 22, 2024Driver Monitoring Systems In Vehicles, Working, Driver Sleepy Alert


