Hello guys, welcome back to my blog. In this article, I will discuss the interfacing of Arduino with a temperature sensor, the connection of temperature sensor with Arduino, Arduino code for the LM35 temperature sensor, working of LM35 sensor, code explanation, etc.
If you have any doubts related to electrical, electronics, and computer science, then ask questions. You can also catch me on Instagram – CS Electrical & Electronics And Chetan Shidling.
Also read:
- Difference Between LiFi And WiFi, Which Is Best To Use
- Difference Between SRAM And DRAM, Characteristics, Advantages
- Top Linux Commands For Engineers, Useful Linux Commands Asked
Interfacing Of Arduino With Temperature Sensor
The important electronic component that is used in daily life to measure temperature is the temperature sensor. It is always used in every component to know the temperature parameter.
In this article, Arduino interfacing with Temperature sensors is discussed. This Sensor is used to estimate the temperature of the surroundings. Temperature Sensor is commonly known as LM35. It is used to give the output temperature in degrees Centigrade.
- The Operating temperature of this sensor varies from -55 degrees centigrade to 150 degrees centigrade.
- LM35 Sensor gives the output more accurate than it is measured with the thermistor
- It consists of three terminals known as VCC, OUTPUT, and GROUND.
- LM35 is a type of Contact Temperature Sensor.
- It is a type of Semiconductor based sensor.
- LM35 is very cheap at cost and easily obtainable sensors.
- The output of this temperature is Analog based.

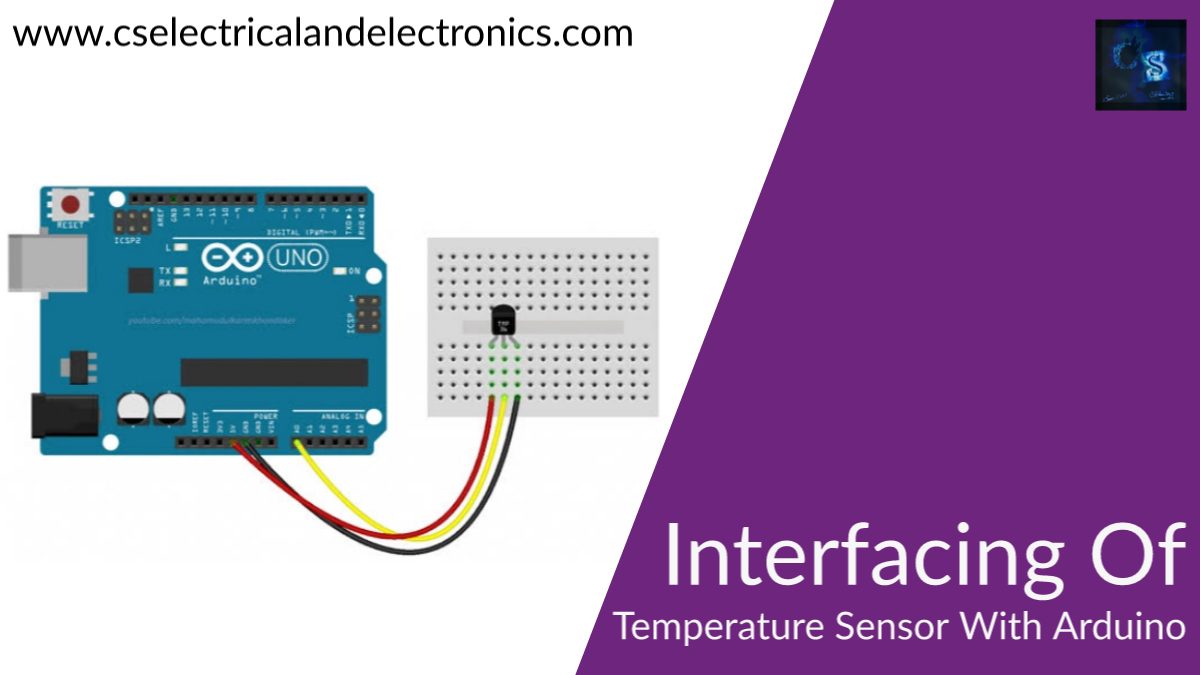
Connecting The Sensor With Arduino
This sensor can be connected to the Arduino and can be programmed accordingly to obtain the temperature output values. This sensor contains three pins VCC, GROUND, and OUTPUT pins. Initially, the VCC pin of the Sensor is connected with the 5V pin of the ARDUINO board by using male to female jumper wire. Next, the GROUND pin of the ARDUINO is connected to the GROUND of the ARDUINO board by using the male to female jumper wire.
Next, finally, the output pin of the sensor is connected to the analog pin on the Arduino board by using the male-to-female jumper wire. With this, the interfacing of the temperature sensor with the Arduino board is completed and after the successful execution of the program, the output values can be retrieved from the LM35 and can run according to our requirements.

Arduino Program Of LM35 Temperature Sensor
float temp;
int tempPin = A1;
void setup() {
 Serial.begin(9600);
}
void loop() {
 temp = analogRead(tempPin);
 // takes analog volt from sensor and save to variable temp
 temp = temp * 0.48828125;
 // change the analog volt to its temperature equivalent
 Serial.print("TEMPERATURE = ");
 Serial.print(temp); // display temperature value
 Serial.print("*C");
 Serial.println();
 delay(1000); // update sensor reading each one second
}
//CS Electrical And Electronics
After the successful writing of the ARDUINO program in the ARDUINO IDE then you can dump the code to the ARDUINO development board after successful execution and running of the program without any errors.
Working Of LM35 Temperature Sensor
The temperature sensor works on the principle of resistance change with the increase in the temperature reading. A change in 10mV in voltage will be there for a change in 1 degree centigrade of temperature. Thus it shows the accurate change in temperature over the given specific temperature range.
This sensor can be used in various applications related to autonomous robotic projects and this sensor is completely designed by using semiconductor material. This sensor can only be used for small projects and specific temperature ranges. For the requirement of higher temperature accurate and effective values then different other sensors designed by the up-gradation of this LM35 sensor.
Explanation Of The Program
After the successful connection of the component to the ARDUINO board as explained in the above discussion and successful execution of the program, the temperature sensor starts functioning by showing up the temperature of the surrounding environment.
Initially, the output pin of the temperature sensor is assigned to the A1 pin. Then the baud rate of 9600 is set up to have serial communication with the Arduino. Then Analog Read command is used to read the temperature from the Analog pin. Then the formula is used to extract the accurate temperature value from the obtained information from the sensor.
Finally, the temperature is printed on the screen that is detected by the LM35 sensor. Later on, the temperature values are detected and printed on the screen with a delay of one second.
Conclusion
The above-discussed information is all about the detailed explanation of the interfacing of LM35 with the Arduino board. This shows that the use of temperature sensors to detect the temperature ensures its importance in the field of Autonomous Robotic Projects.
Thus this knowledge and detailed explanation helps you to show the advancement of your hands-on experience with the temperature sensor and makes you perfect and efficient in handling the projects by inclusion of mechanics, electronics and programming fields with higher output results.
This was about “Interfacing Of Arduino With Temperature Sensor“. I hope this article “Interfacing Of Arduino With Temperature Sensor” may help you all a lot. Thank you for reading.
Also, read:
- 10 Free ADAS Projects With Source Code And Documentation – Learn & Build Today
- 100 + Electrical Engineering Projects For Students, Engineers
- 100+ Indian Startups & What They Are Building
- 1000+ Automotive Interview Questions With Answers
- 1000+ Electronics Projects For Engineers, Diploma, MTech Students
- 1000+ MATLAB Simulink Projects For MTech, Engineering Students
- 2026 Hackathons That Can Change Your Tech Career Forever
- 50 Advanced Level Interview Questions On CAPL Scripting